This post will explain how Django 3 works and we’ll create a blogging app in the process. I assume that you already have installed Python 3, Python Virtualenv, and latest version of Django and pillow package as well.
Related Post: How to install Django 3 on Ubutnu
In case you have not installed yet. I have got tutorial video and blog post to help you install Python 3, pip, virtualenv, django 3 and pillow as well.
Related Post: How to install Django 3 on Windows 10
Once you have installed Python 3, pip, virtualenv, and django 3, you can install pillow with the following commads.
pip install pillowThat was about Django 3 Development Environment setup. Let’s create the django project and then django app.
Check Django Version
There are few ways you can check Django version on version irrespective of your operating system. Using command prompt or terminal run the following command. Make sure your Python virtualenv is activated.
django-admin --versionIf you are in python shell or python file, you can check django version with the following code
import django
print(django.get_version())
You can list all the python packages installed with their current versions with following command
pip listCreate Django 3 Project
django-admin startproject blogdemo && cd blogdemoThis is how to create a django 3 project and change the directory to project root directory.
Run the Django 3 Server
As soon as you run the Django 3 server, the django project create one folder (__pycache__) and a file (db.sqlite3) in the project.
And you also see a warning about unapplied migrations. This error message is showing because Django ships with builtin admin model.
Here is how to run the and run the django migration
python manage.py runserverDjango makemigrations & migrate
makemigrations command is run to create the models for the specific app and migrate is run to apply the models to the database; in other words – migrate is to create the tables structure on the database.
Now kill the running django server with CTRL + C and run the following command to apply the admin models.
python manage.py migrateLet’s Create Django 3 Super User
Run the following command to create django super user and create a user name, password and add your email address to the super user account.
python manage.py createsuperuserAfter creating django super user, you can login to django admin page with created username and password.
http://localhost:8000/adminLet’s create Django 3 App
Difference between Django Project and Django App
Django Project: hold only configuration files and folder.
Django App: is like a module that is plug-able to the Django Project.
To create Django Project, run the following command.
python manage.py startapp blogLet’s plug this app to Django Project
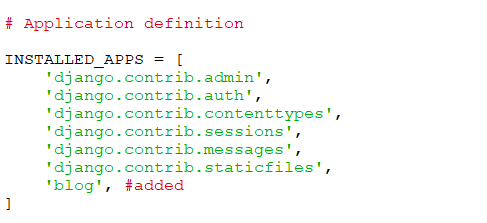
Open the settings.py under blogdemo/blogdemo folder, now look for INSTALLED_APP list
Create blog app models
We are going to create 3 models in blog/models.py
from django.db import models


class Author(models.Model):
	name = models.CharField(max_length=50)
	bio = models.TextField()

	def __str__(self):
		return self.name

class Category(models.Model):
	category = models.CharField( max_length=50)
	description = models.TextField()

	def __str__(self):
		return self.category

class Article(models.Model):
	title = models.CharField(max_length=50)
	image = models.ImageField(upload_to="images/")
	content = models.TextField()
	category = models.ForeignKey(Category, on_delete=models.CASCADE)
	author = models.ForeignKey(Author, on_delete=models.CASCADE)

	def __str__(self):
		return self.title
Run migration for blog models
python manage.py makemigrations blogthen
python manage.py migrateRegister blog models in blog/admin.py
First we need to import all the models in blog/admin.py file and register them to admin page
from django.contrib import admin
# from .models import *
from .models import Author, Category, Article


admin.site.register(Author)
admin.site.register(Category)
admin.site.register(Article)
Let’s configure django project to handle static files/views
Let’s first create templates folder in project root directory and create two html file index.html and single.html
mkdir templates && cd templates && touch {index,single}.htmlOpen blogdemo/settings.py add templates folder to TEMPLATES list
TEMPLATES = [
    {
        'BACKEND': 'django.template.backends.django.DjangoTemplates',
#this DIRS dict value
        'DIRS': [os.path.join(BASE_DIR, 'templates')],

        'APP_DIRS': True,
        'OPTIONS': {
            'context_processors': [
                'django.template.context_processors.debug',
                'django.template.context_processors.request',
                'django.contrib.auth.context_processors.auth',
                'django.contrib.messages.context_processors.messages',
            ],
        },
    },
]
Django Media Root & URL for images
Add the following code to blogdemo/settings.py. This will create media folder in the root directory.
MEDIA_ROOT = os.path.join(BASE_DIR, 'media')
MEDIA_URL = '/media/'
The following code will automate the image url creation process and image upload. blogdemo/urls.py
from django.conf import settings #added
from django.conf.urls.static import static #added
from django.contrib import admin
from django.urls import path

urlpatterns = [
    path('admin/', admin.site.urls),
] + static(settings.MEDIA_URL, document_root=settings.MEDIA_ROOT) #added
Login to Django Admin page
Run the Django server and login to Django admin page
Create an Author, a Category and a few Articles
I assume that you already have created at-least an Author, a Category, and a few Articles.
Let’s Create Blog Views/Controllers
Django’s Views are like controllers in other MVC frameworks like Rails. Views need to have access to the models. We’ll import the blog models and use Django ORM to fetch data from database tables.
from django.shortcuts import render
from .models import Article

def index(request):
	articles = Article.objects.all()
	return render(request, 'index.html', {"articles": articles})

def single(request, id):
	single = Article.objects.get(id=id)
	return render(request, 'single.html', {"single": single})
Let’s Create Blog urls/routes
We’ll have to create urls.py file in our /blog app and create routes/urls by importing path module in blog/urls.py
from project root directory run the following command or create urls.py file manually.
touch blog/urls.pyTo create url path in blog/urls.py we need to import blog/views.py
from django.urls import path
from . import views


urlpatterns = [
	path('', views.index, name='index'),
	path('<int:id>/', views.single, name='single'),

]
Add blog urls to project urls
To add blog/urls.py to blogdemo/urls.py, we need to import include module.
from django.conf import settings
from django.conf.urls.static import static
from django.contrib import admin
from django.urls import path, include # imported include module

urlpatterns = [
	path('', include('blog.urls')), #added
    path('admin/', admin.site.urls),
] + static(settings.MEDIA_URL, document_root=settings.MEDIA_ROOT)
Let’s finally create templates for blog app
Django’s templates are called views in other MVC framework. In the templates/index.html file, we’ll iterate (with for in iterator/loop) through the articles variable that holds all Article objects. Variable is accessible to the index.html file via index method in views.py.
List Article View
<!DOCTYPE html>
<html>
<head>
	<title>Django Blog App</title>
</head>
<body>

	{% for article in articles %}
		<a href="{% url 'single' article.id%}"><h2>{{article.title}}</h2></a>
		<p>Posted in: {{article.category}}, Posted by: {{article.author}}</p>
		<img src="{{article.image.url}}" alt="{{article.title}}">
		<p>{{article.content}}</p>
	{% endfor %}

</body>
</html>
Single Article view
<!DOCTYPE html>
<html lang="en">
<head>
	<meta charset="UTF-8">
	<title>Django Blog Single Page</title>
</head>
<body>

	<a href="{% url 'index' %}">...Go Back</a>

	<h2>{{single.title}}</h2>
	<p>Posted in: {{single.category}}, Posted by: {{single.author}}</p>
	<img src="{{single.image.url}}" alt="{{single.title}}">
	<p>{{single.content}}</p>

</body>
</html>
Join Advanced Python 3 Bootcamp online today